

How to insulate a flat roof?
East guide on how to insulate a flat roof
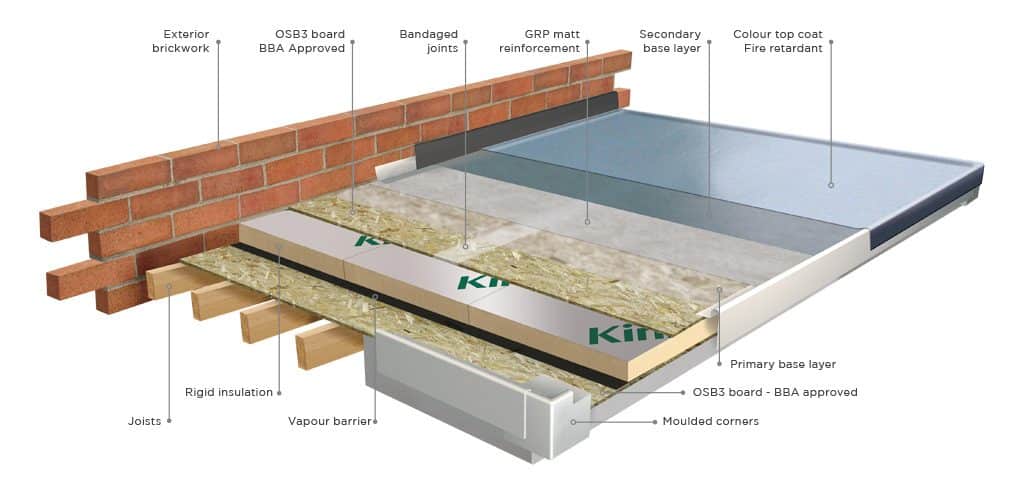
Usually, this process will consist of 3 main materials, we will go into a bit more detail as we go on through the process.
- SUB DECK
- VAPOUR CONTROL LAYER
- INSULATION BOARD
Insulating a flat roof can help improve the energy efficiency of your building and reduce heating costs in the UK Especially if we get snow like in March 2023.
Here’s a step-by-step guide on how to insulate a flat roof:
How to insulate a flat roof? Step 1: Determine the type of insulation you need There are several types of insulation materials that you can use to insulate your flat roof, such as:
- Rigid foam insulation: This type of insulation is made of polystyrene or polyisocyanurate and is installed in a continuous layer across the entire roof surface.
- Spray foam insulation: This type of insulation is applied as a liquid that expands and hardens into a foam that fills in all gaps and voids in the roof surface.
- Fiberglass or mineral wool insulation: This type of insulation is made of glass or rock fibers and is installed in batts or rolls between the roof joists.
Each type of insulation has its own advantages and disadvantages, so you should consider factors such as cost, R-value (a measure of insulation’s effectiveness), and moisture resistance when choosing the best insulation material for your flat roof. We suggest chatting with either a professional roofer or the local building inspector. most common would be rigid 120mm thick flat sheets made by companies like Celotex.

Step 2: Prepare the roof surface Before installing the insulation, you need to ensure that the roof surface is clean and free of debris, such as leaves, branches, and dirt. Remove any loose or damaged roofing material and repair any leaks or damage to the roof structure. If necessary, install a vapor barrier to prevent moisture from penetrating the roof surface.
You should also check the roof’s drainage system to ensure that water can flow freely and avoid pooling on the roof surface. Make sure that the gutters and downspouts are clean and functioning properly to prevent water damage to the roof.
In addition, you may need to install roof vents to provide proper ventilation and prevent moisture buildup in the insulation layer. The type and number of vents required will depend on the size and design of your roof.

Installing a vapor barrier is an important step in preparing the roof surface for insulation. Here are the steps to install a vapor barrier on a flat roof:
- Clean the roof surface: Use a broom or blower to remove any debris or dust from the roof surface.
- Cut the vapor barrier material: Measure the length and width of the roof surface and cut the vapor barrier material to fit. Make sure to leave some extra material on the sides to allow for overlap.
- Lay the vapor barrier: Start at one end of the roof and unroll the vapor barrier across the surface, making sure it’s flat and smooth. Use weights or adhesive to hold the barrier in place if needed.
- Overlap the seams: Wherever two pieces of vapor barrier meet, overlap them by at least 6 inches. Secure the seams with adhesive tape designed for use with the specific vapor barrier material you’re using.
- Trim the edges: Once the entire surface is covered with the vapor barrier, trim any excess material from the edges.
- Inspect the vapor barrier: Check the entire surface of the vapor barrier for any holes or tears. Seal any openings with the appropriate adhesive tape or sealant.
A properly installed vapor barrier will prevent moisture from penetrating the insulation layer and causing damage to the roof structure.

Here are the steps to fit 120mm rigid insulation to a flat roof: How to insulate a flat roof?
- Measure the roof area: Measure the length and width of the roof to determine the amount of insulation needed. Remember to account for any obstructions such as vents or skylights.
- Prepare the roof surface: Ensure that the roof surface is clean and free of debris. Repair any leaks or damage to the roof structure. Install a vapor barrier to prevent moisture from penetrating the roof surface.
- Cut the insulation boards: Use a saw to cut the insulation boards to the correct size to fit the roof area. Make sure to measure carefully to avoid any gaps or overlaps.
- Install the insulation boards: Place the insulation boards on the roof surface, starting at one end and working your way across. Ensure that each board is flush against the previous one and there are no gaps or overlaps. Use adhesive or mechanical fixings to secure the insulation boards to the roof.
- Seal the joints: Seal the joints between the insulation boards with adhesive tape or sealant to prevent any air leakage.

fibreglass for roofs
Here are the steps to fit OSB tongue and groove (T&G) boards for a fibreglass roof:
- Measure the roof area: Measure the length and width of the roof to determine the amount of OSB T&G boards needed.
- Prepare the roof surface: Ensure that the roof surface is clean and free of debris. Repair any leaks or damage to the roof structure. Install a vapor barrier to prevent moisture from penetrating the roof surface.
- Install the first row of OSB T&G boards: Starting at one end of the roof, lay the first row of OSB T&G boards across the roof surface, with the tongue side facing towards the edge of the roof. Make sure the boards are flush against each other and there are no gaps. Use screws or nails to secure the boards to the roof structure.
- Install the second row of OSB T&G boards: Lay the second row of OSB T&G boards on top of the first row, with the groove side facing towards the edge of the roof. Again, make sure the boards are flush against each other and there are no gaps. Use screws or nails to secure the boards to the roof structure.
- Continue installing the OSB T&G boards: Repeat step 4 until the entire roof surface is covered with OSB T&G boards.
- Seal the joints: Seal the joints between the OSB T&G boards with sealant to prevent any air leakage.
- Install the fiberglass roof: Apply a layer of fiberglass resin onto the OSB T&G boards using a roller or brush. Lay the fiberglass mat onto the resin and apply another layer of resin on top. Repeat this process until the entire roof is covered with fiberglass. Allow the fiberglass to cure according to our instructions.
By properly fitting OSB T&G boards for a fibreglass roof, you can create a strong and durable roofing system that provides excellent insulation and weather protection. Read more on the best boards for a GRP Roof
